Connecting to Services
Introduction
Clients form “connections” to services to access the resources provided by the service, as discussed in Client-Service Object-Oriented Model. The connection consists of three pieces: the transport connection between the nodes, the client references/proxies, and the service endpoint. These pieces are all created automatically when the connection is created.
Connections can be created using several different methods. These methods include:
Connect using a URL
Create a subscription using a URL
Create a subscription based on service criteria
Connect using the Device Connector
Connect using the PyRI Device Manager
Use discovery to find available devices
The best method to use will depend on the exact use case. For most simple use cases, such as a laboratory environment, using a URL or a subscription with a URL is the simplest. For production environments, using the Device Connector or the PyRI Device Manager is probably more appropriate.
Note that firewalls and networking configurations can cause problems with connections between computers. See the “Networking and Firewalls” section below for more information.
This page is only an introduction to creating connections. See the more in-depth documentation for more details.
Connect using a URL
The simplest and most direct method to connect to a service is by using a URL and the ConnectService() function.
1# connect_url.py - Connect to a service using a URL
2
3from RobotRaconteur.Client import *
4
5url = 'rr+tcp://localhost:29200?service=reynard'
6c = RRN.ConnectService(url)
7c.say("Hello from connect_url!")
1% connect_url.m - Connect to a service using a URL
2
3url = 'rr+tcp://localhost:29200?service=reynard';
4c = RobotRaconteur.ConnectService(url);
5c.say('Hello from connect_url!');
6RobotRaconteur.DisconnectService(c);

 1// connect_url.cs - Connect to a service using a URL
 2
 3using System;
 4using RobotRaconteur;
 5using System.Threading;
 6using System.Threading.Tasks;
 7using System.Linq;
 8
 9// Initialize the client node
10using (var node_setup = new ClientNodeSetup(args))
11{
12    // Connect to the Reynard service using a URL
13    var c = (experimental.reynard_the_robot.Reynard)RobotRaconteurNode.s.ConnectService(
14        "rr+tcp://localhost:29200?service=reynard");
15
16    // Say hello
17    c.say("Hello from connect_url!");
18}
 1// connect_url.cpp - Connect to a service using a URL
 2
 3#include <stdio.h>
 4#include <iostream>
 5#include <RobotRaconteur.h>
 6#include "robotraconteur_generated.h"
 7
 8// Only use the RR alias in cpp files. Do not use it in header files.
 9namespace RR = RobotRaconteur;
10
11int main(int argc, char* argv[])
12{
13    // Use RobotRaconteur::NodeSetup to initialize Robot Raconteur
14    RR::ClientNodeSetup node_setup(ROBOTRACONTEUR_SERVICE_TYPES, argc, argv);
15
16    // Connect to the service
17    std::string url = "rr+tcp://localhost:29200/?service=reynard";
18    auto reynard =
19        RR::rr_cast<experimental::reynard_the_robot::Reynard>(RR::RobotRaconteurNode::s()->ConnectService(url));
20
21    // Say hello
22    reynard->say("Hello from connect_url!");
23
24    return 0;
25}
Finding the URL for a service can be tricky. There are multiple “transports” to connect to the service,
and the exact contents of the URL are very specific to the network topology between the client and the service.
In the examples above, the rr+tcp “scheme” at the beginning of the URL means the connection is using TCP/IP,
a networking transport that is common on the Internet and local networks. localhost means that the service is
on the same computer as the client. This would be replaced with the IP address of the computer running the service
if it was not running on the same machine. For example, 192.168.11.14 is an IPv4 address for a computer on
a local network. The ?service=reynard means that we are attempting to connect to a service named reynard
on the node. The rr+local transport scheme for the “local” transport is also frequently used. This
transport uses local sockets and has higher performance since it is only used for services running on the same computer.
The README, documentation, and examples for services will often contain information about how to find the URL for the service.
The Robot Raconteur Service Browser can be used to find service URLs using discovery.
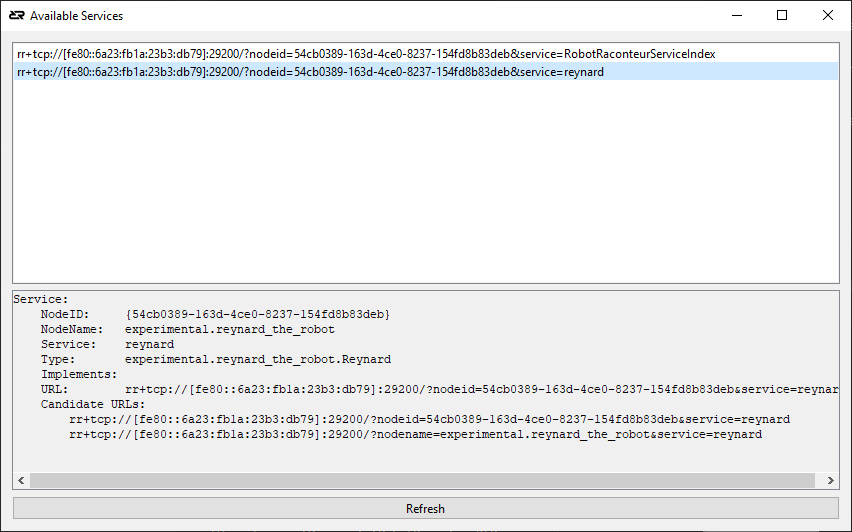
It is advised to always run the service browser on the same computer as the client. This will return a URL that is valid for that exact scenario. For example, when searching for Reynard the Robot on a different computer, the following URL is returned:
rr+tcp://[fe80::6a23:fb1a:23b3:db79]:29200/?nodeid=54cb0389-163d-4ce0-8237-154fd8b83deb&service=reynard
Note the IP address in this URL is an IPv6 link-local address rather than IPv4. By default, Robot Raconteur
will use IPv6 addresses since they automatically configure and can be configured to be permanently static
without the headache of IPv4 address assignment. The fe80:: prefix means that this address is only
valid within a local network. Note that this example address is only valid for the example network and
will be different for every setup. The nodeid and nodename are optional for TCP in some scenarios,
but one or both are required for other transports like rr+local.
Example rr+local URLs:
rr+local:///?nodeid=e513887c-4512-4ce5-a7e7-1396cfc718f2&service=reynard
rr+local:///?nodename=experimental.reynard_the_robot&service=reynard
Note
If discovery does not work, there is probably a firewall configuration error. See the “Firewall” section below.
Note
The following sections on subscriptions and discovery describe how to create connections automatically based on criteria for selecting services without the need for a manually configured URL.
The URL has a special form:
<scheme>://<host>:<port>/?nodename=<nodename>&nodeid=<nodeid>&service=<servicename>
See the Framework Nodes and Communication documentation for more details on URLs.
Services opened using the ConnectService() function should be closed using the DisconnectService() function,
or be closed automatically when the node is shut down.
Subscription using a URL
Robot Raconteur subscriptions are designed to create a robust connection to services and to manage the lifecycle of connections. They also allow for connectionless-like interaction with pipe and wire members. See subscriptions for more information.
Subscriptions can be created using a URL or through criteria. See the rest of this document for information on criteria-based connections.
Creating a subscription using a URL is similar to connecting to a service using ConnectService(), except
instead of returning a client connection, a ServiceSubscription is returned.
1# subscribe_url.py - Subscribe to a service using a URL
2
3from RobotRaconteur.Client import *
4
5url = 'rr+tcp://localhost:29200?service=reynard'
6sub = RRN.SubscribeService(url)
7c = sub.GetDefaultClientWait(10)
8c.say("Hello from URL subscription!")
1% subscribe_url.m - Connect to a service using a URL
2
3url = 'rr+tcp://localhost:29200?service=reynard';
4sub = RobotRaconteur.SubscribeService(url);
5c = sub.GetDefaultClientWait(10);
6c.say('Hello from URL subscription!');
7sub.Close();

 1// subscribe_url.cs - Subscribe to a service using a URL
 2
 3using System;
 4using RobotRaconteur;
 5using System.Threading;
 6using System.Threading.Tasks;
 7using System.Linq;
 8
 9// Initialize the client node
10using (var node_setup = new ClientNodeSetup(args))
11{
12    // Subscribe to the service using a URL
13    string url = "rr+tcp://localhost:29200?service=reynard";
14    var sub = RobotRaconteurNode.s.SubscribeService(url);
15
16    // Get the default client
17    var c = (experimental.reynard_the_robot.Reynard)sub.GetDefaultClientWait(10000);
18
19    // Say hello
20    c.say("Hello from subscribe_url!");
21}
 1// subscribe_url.cpp - Subscribe to a service using a URL
 2
 3#include <stdio.h>
 4#include <iostream>
 5#include <RobotRaconteur.h>
 6#include "robotraconteur_generated.h"
 7
 8// Only use the RR alias in cpp files. Do not use it in header files.
 9namespace RR = RobotRaconteur;
10
11int main(int argc, char* argv[])
12{
13    // Use RobotRaconteur::NodeSetup to initialize Robot Raconteur
14    RR::ClientNodeSetup node_setup(ROBOTRACONTEUR_SERVICE_TYPES, argc, argv);
15
16    // Subscribe to the service
17    std::string url = "rr+tcp://localhost:29200/?service=reynard";
18    RR::ServiceSubscriptionPtr sub = RR::RobotRaconteurNode::s()->SubscribeService(url);
19
20    // Get the default client
21    auto reynard = sub->GetDefaultClientWait<experimental::reynard_the_robot::Reynard>(10000);
22
23    // Say hello
24    reynard->say("Hello from subscribe_url!");
25
26    return 0;
27}
In these examples, the SubscribeService() and GetDefaultClientWait() functions are used to create
the connection. The GetDefaultClient() and GetDefaultClientWait() functions will return the “default” connected
client. Since SubscribeService() only connects one client, this is the recommended way to retrieve the connection.
Note
In most cases, it is recommended to use SubscribeService() and GetDefaultClientWait() since it will
not return an error if the client starts before the service is ready.
See subscriptions for more information about the capabilities of ServiceSubscription.
Subscription Based on Service Criteria
The SubscribeServiceByType() function returns a ServiceSubscription that uses discovery to connect
to services rather than using a URL. It decides which services to connect to based on “criteria”, essentially
filtering to select services to connect to.
The available criteria are:
The service type of the root object, for example,
com.robotraconteur.robotics.robot.RobotThe name of the service
The node name or node ID of the node containing the service
The type of transport used to connect to the service
The attributes of the service
A user-defined predicate function
Note
In most cases, it is preferred to use the Device Connector described in the next section rather than directly
using SubscribeServiceByType().
Note
SubscribeServiceByType() will match services where the root object extends/implements the required type along
with direct implementations. This allows for new types to extend existing types and still be matched, allowing
for forward compatibility.
Simple examples connecting all services of a specific type, in this case, experimental.reynard_the_robot.Reynard:
 1# subscribe_type.py - Subscribe to services by type
 2
 3from RobotRaconteur.Client import *
 4import time
 5
 6# Subscribe to a service by type
 7root_object_type = "experimental.reynard_the_robot.Reynard"
 8sub = RRN.SubscribeServiceByType(root_object_type)
 9# Give a few seconds for the service to be connected
10time.sleep(6)
11
12# Run a function on all connected services. Could also use GetDefaultClientWait() to
13# get the first connected client and run functions on that client
14# without waiting for all clients to connect
15connected_clients = sub.GetConnectedClients()
16for k, c in connected_clients.items():
17    print(f"Saying hello on client {k}")
18    c.say("Hello from type subscription!")
 1% subscribe_type.py - Subscribe to services by type
 2
 3root_object_type = 'experimental.reynard_the_robot.Reynard';
 4sub = RobotRaconteur.SubscribeServiceByType(root_object_type);
 5
 6% Give a few seconds for the service to be connected
 7pause(6);
 8
 9% Run a function on all connected services. Could also use
10% GetDefaultClientWait() to get the first connected client and
11% run functions on that client without waiting for all clients to connect
12connected_clients = sub.GetConnectedClients();
13
14% Loop connected clients and call say method
15client_keys = keys(connected_clients);
16for i = 1:length(client_keys)
17    key = client_keys{i};
18    c = connected_clients(key);
19    c.say('Hello from type subscription!');
20end
21
22sub.Close();

 1// subscribe_type.cs - Subscribe to a service by type
 2
 3using System;
 4using RobotRaconteur;
 5using System.Threading;
 6using System.Threading.Tasks;
 7using System.Linq;
 8
 9// Initialize the client node
10using (var node_setup = new ClientNodeSetup(args))
11{
12    // Subscribe to a service by type
13    string[] root_object_type = new string[] { "experimental.reynard_the_robot.Reynard" };
14    var sub = RobotRaconteurNode.s.SubscribeServiceByType(root_object_type);
15
16    // Give a few seconds for the service to be connected
17    Thread.Sleep(6000);
18
19    // Run a function on all connected services. Could also use GetDefaultClientWait() to
20    // get the first connected client and run functions on that client
21    // without waiting for all clients to connect
22    var connected_clients = sub.GetConnectedClients();
23    foreach (var c1 in connected_clients)
24    {
25        var c = (experimental.reynard_the_robot.Reynard)c1.Value;
26        c.say("Hello from subscribe_type!");
27    }
28}
 1// subscribe_type.cpp - Subscribe to a service by type
 2
 3#include <stdio.h>
 4#include <iostream>
 5#include <RobotRaconteur.h>
 6#include "robotraconteur_generated.h"
 7
 8// Only use the RR alias in cpp files. Do not use it in header files.
 9namespace RR = RobotRaconteur;
10
11int main(int argc, char* argv[])
12{
13    // Use RobotRaconteur::NodeSetup to initialize Robot Raconteur
14    RR::ClientNodeSetup node_setup(ROBOTRACONTEUR_SERVICE_TYPES, argc, argv);
15
16    // Subscribe to a service by type
17    std::vector<std::string> root_object_type = {"experimental.reynard_the_robot.Reynard"};
18    RR::ServiceSubscriptionPtr sub = RR::RobotRaconteurNode::s()->SubscribeServiceByType(root_object_type);
19
20    // Give a few seconds for the service to be connected
21    boost::this_thread::sleep(boost::posix_time::seconds(6));
22
23    // Run a function on all connected services. Could also use GetDefaultClientWait() to
24    // get the first connected client and run functions on that client
25    // without waiting for all clients to connect
26    auto connected_clients = sub->GetConnectedClients();
27    for (auto client : connected_clients)
28    {
29        auto reynard = RR::rr_cast<experimental::reynard_the_robot::Reynard>(client.second);
30        reynard->say("Hello from subscribe_type!");
31    }
32
33    return 0;
34}
The following examples show how to use filters with SubscribeServiceByType().
SubscribeServiceByType() Filter Examples (click to expand)
 1# subscribe_filter.py - Subscribe to services by type using a filter
 2
 3from RobotRaconteur.Client import *
 4import time
 5
 6
 7def subscription_predicate(service_info2):
 8    # This function is called for each discovered service
 9    # Return True to connect to the service, False to ignore
10    # The service_info2 parameter is a ServiceInfo2 object
11    # containing information about the discovered service
12    return True
13
14
15# Populate a subscription filter. Note that all empty fields are considered "wildcards" that match any value
16f = RR.ServiceSubscriptionFilter()
17# Only connect to services named "reynard"
18f.ServiceNames = ['reynard']
19# Only use rr+tcp transport
20f.TransportSchemes = ['rr+tcp', 'rr+local']
21# The ServiceSubscriptionFilter has powerful attribute matching capabilities
22# The use is intended for advanced use cases
23# f.Attributes = <Advanced attribute matching>
24# f.AttributesMatchOperation = ServiceSubscriptionFilterAttributeGroupOperation_AND
25# Set a "predicate" function that is called for each discovered service
26f.Predicate = subscription_predicate
27# Set the maximum number of clients to connect. Default is -1 (no limit)
28f.MaxConnections = 5
29
30# Create a ServiceSubscriptionFilterNode for node matching
31n = RR.ServiceSubscriptionFilterNode()
32# Only connect to nodes named "experimental.reynard_the_robot"
33n.NodeName = "experimental.reynard_the_robot"
34# Only connect to nodes with NodeID as listed. This will be different for every instance of the node
35# n.NodeID = RR.NodeID('12345678-1234-1234-1234-123456789abc')
36# Username and credentials can also be set for services that require authentication.
37# This should only be used when NodeID is also specified so the credentials are not sent to the wrong node
38# n.Username = "username"
39# n.Credentials = {"password", RR.VarValue("my_password", "string")}
40f.Nodes.append(n)
41
42# Subscribe to a service by type using the filter
43root_object_type = "experimental.reynard_the_robot.Reynard"
44sub = RRN.SubscribeServiceByType(root_object_type, f)
45# Give a few seconds for the service to be connected
46time.sleep(6)
47
48# Run a function on all connected services. Could also use GetDefaultClientWait() to
49# get the first connected client and run functions on that client
50# without waiting for all clients to connect
51connected_clients = sub.GetConnectedClients()
52for k, c in connected_clients.items():
53    c.say("Hello from subscribe_filter!")
 1% subscribe_filter.py - Subscribe to services by type using a filter
 2
 3function subscribe_filter()
 4
 5% Populate a subscription filter. Note that all missing fields are
 6% considered "wildcards" that match any value
 7f = struct;
 8% Only connect to services named "reynard"
 9f.ServiceNames = {'reynard'};
10% Only use rr+tcp transport
11f.TransportSchemes = {'rr+tcp'};
12% The ServiceSubscriptionFilter has powerful attribute matching capabilities
13% The use is intended for advanced use cases
14% f.Attributes = <Advanced attribute matching>
15% f.AttributesMatchOperation = 'and';
16% "Predicate" not supported in matlab
17% Set the maximum number of clients to connect. Default is -1 (no limit)
18f.MaxConnections = -1;
19
20% Create a ServiceSubscriptionFilterNode for node matching
21n = struct;
22% Only connect to nodes named "experimental.reynard_the_robot"
23n.NodeName = 'experimental.reynard_the_robot';
24% Only connect to nodes with NodeID as listed. This will be different for every instance of the node
25% n.NodeID = '12345678-1234-1234-1234-123456789abc';
26%Username and credentials can also be set for services that require authentication.
27%This should only be used when NodeID is also specified so the credentials are not sent to the wrong node
28%n.Username = 'username';
29%n.Credentials = containers.Map({'password'}, {RobotRaconteurVarValue('my_password', 'string')});
30f.Nodes = {n};
31
32% Subscribe to a service by type using the filter
33root_object_type = 'experimental.reynard_the_robot.Reynard';
34sub = RobotRaconteur.SubscribeServiceByType(root_object_type, f);
35
36% Give a few seconds for the service to be connected
37pause(6);
38
39% Run a function on all connected services. Could also use
40% GetDefaultClientWait() to get the first connected client and
41% run functions on that client without waiting for all clients to connect
42connected_clients = sub.GetConnectedClients();
43
44% Loop connected clients and call say method
45client_keys = keys(connected_clients);
46for i = 1:length(client_keys)
47    key = client_keys{i};
48    c = connected_clients(key);
49    c.say('Hello from subscribe_filter!');
50end
51
52sub.Close();
53
54end

 1// subscribe_filter.cs - Subscribe to a service by type using a filter
 2
 3using System;
 4using RobotRaconteur;
 5using System.Threading;
 6using System.Threading.Tasks;
 7using System.Linq;
 8
 9bool subscription_predicate(ServiceInfo2 service_info)
10{
11    // This function is called for each discovered service
12    // Return true to connect to the service, false to ignore
13    // The service_info2 parameter is a ServiceInfo2 object
14    // containing information about the discovered service
15    return true;
16}
17
18// Initialize the client node
19using (var node_setup = new ClientNodeSetup(args))
20{
21
22    // Populate a subscription filter. Note that all empty fields are considered "wildcards" that match any value
23    var f = new ServiceSubscriptionFilter();
24    // Only connect to services named "reynard"
25    f.ServiceNames = new string[] { "reynard" };
26    // Only use rr+tcp and rr+local transport
27    f.TransportSchemes = new string[] { "rr+tcp", "rr+local" };
28    // The ServiceSubscriptionFilter has powerful attribute matching capabilities
29    // The use is intended for advanced use cases
30    // f.Attributes = <Advanced attribute matching>
31    // f.AttributesMatchOperation = ServiceSubscriptionFilterAttributeGroupOperation.AND;
32    // Set a "predicate" function that is called for each discovered service
33    f.Predicate = subscription_predicate;
34    // Set the maximum number of clients to connect. Default is -1 (no limit)
35    f.MaxConnections = 5;
36
37    // Create a ServiceSubscriptionFilterNode for node matching
38    var n = new ServiceSubscriptionFilterNode();
39    // Only connect to nodes named "experimental.reynard_the_robot"
40    n.NodeName = "experimental.reynard_the_robot";
41    // Only connect to nodes with NodeID as listed. This will be different for every instance of the node
42    // n.NodeID = new NodeID('12345678-1234-1234-1234-123456789abc');
43    // Username and credentials can also be set for services that require authentication.
44    // This should only be used when NodeID is also specified so the credentials are not sent to the wrong node
45    // n.Username = "username"
46    // auto credentials = RR::AllocateEmptyRRMap<std::string, RR::RRValue>();
47    // credentials->insert({"password", RR::VarValue("my_password", "string")});
48    // n.Credentials = credentials;
49    f.Nodes = new ServiceSubscriptionFilterNode[] { n };
50
51    // Subscribe to a service by type
52    string[] root_object_type = new string[] { "experimental.reynard_the_robot.Reynard" };
53    var sub = RobotRaconteurNode.s.SubscribeServiceByType(root_object_type, f);
54
55    // Give a few seconds for the service to be connected
56    Thread.Sleep(6000);
57
58    // Run a function on all connected services. Could also use GetDefaultClientWait() to
59    // get the first connected client and run functions on that client
60    // without waiting for all clients to connect
61    var connected_clients = sub.GetConnectedClients();
62    foreach (var c1 in connected_clients)
63    {
64        var c = (experimental.reynard_the_robot.Reynard)c1.Value;
65        c.say("Hello from subscribe_filter!");
66    }
67}
 1// subscribe_filter.cpp - Subscribe to a service by type using a filter
 2
 3#include <stdio.h>
 4#include <iostream>
 5#include <RobotRaconteur.h>
 6#include "robotraconteur_generated.h"
 7
 8// Only use the RR alias in cpp files. Do not use it in header files.
 9namespace RR = RobotRaconteur;
10
11bool subscription_predicate(const RR::ServiceInfo2& service_info2)
12{
13    // This function is called for each discovered service
14    // Return true to connect to the service, false to ignore
15    // The service_info2 parameter is a ServiceInfo2 object
16    // containing information about the discovered service
17    return true;
18}
19
20int main(int argc, char* argv[])
21{
22    // Use RobotRaconteur::NodeSetup to initialize Robot Raconteur
23    RR::ClientNodeSetup node_setup(ROBOTRACONTEUR_SERVICE_TYPES, argc, argv);
24
25    // Populate a subscription filter. Note that all empty fields are considered "wildcards" that match any value
26    auto f = RR_MAKE_SHARED<RR::ServiceSubscriptionFilter>();
27    // Only connect to services named "reynard"
28    f->ServiceNames.push_back("reynard");
29    // Only use rr+tcp and rr+local transport
30    f->TransportSchemes.push_back("rr+tcp");
31    f->TransportSchemes.push_back("rr+local");
32    // The ServiceSubscriptionFilter has powerful attribute matching capabilities
33    // The use is intended for advanced use cases
34    // f->Attributes = <Advanced attribute matching>
35    // f->AttributesMatchOperation = RR::ServiceSubscriptionFilterAttributeGroupOperation_AND;
36    // Set a "predicate" function that is called for each discovered service
37    f->Predicate = subscription_predicate;
38    // Set the maximum number of clients to connect. Default is -1 (no limit)
39    f->MaxConnections = 5;
40
41    // Create a ServiceSubscriptionFilterNode for node matching
42    auto n = RR_MAKE_SHARED<RR::ServiceSubscriptionFilterNode>();
43    // Only connect to nodes named "experimental.reynard_the_robot"
44    n->NodeName = "experimental.reynard_the_robot";
45    // Only connect to nodes with NodeID as listed. This will be different for every instance of the node
46    // n->NodeID = RR::NodeID('12345678-1234-1234-1234-123456789abc');
47    // Username and credentials can also be set for services that require authentication.
48    // This should only be used when NodeID is also specified so the credentials are not sent to the wrong node
49    // n->Username = "username";
50    // auto credentials = RR::AllocateEmptyRRMap<std::string, RR::RRValue>();
51    // credentials->insert({"password", RR::VarValue("my_password", "string")});
52    // n->Credentials = credentials;
53    f->Nodes.push_back(n);
54
55    // Subscribe to a service by type using the filter
56    std::vector<std::string> root_object_type = {"experimental.reynard_the_robot.Reynard"};
57    RR::ServiceSubscriptionPtr sub = RR::RobotRaconteurNode::s()->SubscribeServiceByType(root_object_type, f);
58
59    // Give a few seconds for the service to be connected
60    boost::this_thread::sleep(boost::posix_time::seconds(6));
61
62    // Run a function on all connected services. Could also use GetDefaultClientWait() to
63    // get the first connected client and run functions on that client
64    // without waiting for all clients to connect
65    auto connected_clients = sub->GetConnectedClients();
66    for (auto client : connected_clients)
67    {
68        auto reynard = RR::rr_cast<experimental::reynard_the_robot::Reynard>(client.second);
69        reynard->say("Hello from subscribe_filter!");
70    }
71
72    return 0;
73}
The SubscribeServiceByType function and ServiceSubscription provide sophisticated capabilities.
See subscriptions and the documentation specific to each programming language for more information.
Device Connector
The Device Connector is a utility provided as part of the Robot Raconteur Companion for Python and C++. The
Device Connector uses the “Device” concept discussed in device-concept that is introduced
by the Robot Raconteur Standard Types. All “Devices” provide a DeviceInfo structure that contains
metadata about the device, including a unique identifier (name and UUID), model and manufacturer information,
device class information, serial number, description, tags, and more. The Device Connector uses this metadata
to connect to devices. The Device Connector can also use URLs and subscription filters to connect to services.
This capability is built on top of the Robot Raconteur subscription system.
The Device Connector uses the DeviceConnectorDetails structure to specify which devices to connect to. The
DeviceConnectorDetails can use the following methods to select devices:
Device name, along with additional information like tags, manufacturer, model, and serial number. The device must provide a
DeviceInfostructure to use this method.A list of candidate URLs
A service type and filter
The following example uses a DeviceConnector to connect to the camera found in the Training Simulator robot scenes:
 1# device_connector.py - Example of using the DeviceConnector class to connect to a device
 2
 3from RobotRaconteur.Client import *
 4from RobotRaconteurCompanion.Util.DeviceConnector import DeviceConnector, DeviceConnectorDetails
 5from RobotRaconteurCompanion.Util.ImageUtil import ImageUtil
 6import cv2
 7
 8# Create a DeviceConnector object
 9con = DeviceConnector()
10
11# Add a device to the connector
12d1 = DeviceConnectorDetails(device_nickname="camera", device="gazebo_camera")
13con.AddDevice(d1)
14
15# Get the ServiceSubscription to the camera
16sub = con.GetDevice("camera")
17
18# Get the default client and capture and image
19c = sub.GetDefaultClientWait(10)
20raw_img = c.capture_frame()
21image_util = ImageUtil(client_obj=c)
22
23# Display the image
24img = image_util.image_to_array(raw_img)
25cv2.namedWindow("Image")
26cv2.imshow("Image", img)
27cv2.waitKey()
28cv2.destroyAllWindows()
 1// device_connector.cpp - Example of using the DeviceConnector class to connect to a device
 2
 3#include <stdio.h>
 4#include <iostream>
 5#include <RobotRaconteur.h>
 6#include <RobotRaconteurCompanion/Util/DeviceConnector.h>
 7#include <RobotRaconteurCompanion/StdRobDef/StdRobDefAll.h>
 8#include <RobotRaconteurCompanion/Util/ImageUtil.h>
 9#include <RobotRaconteurCompanion/Util/IdentifierUtil.h>
10#include <opencv2/highgui/highgui.hpp>
11
12// Only use the RR alias in cpp files. Do not use it in header files.
13namespace RR = RobotRaconteur;
14namespace RRC = RobotRaconteur::Companion;
15namespace RR_Util = RobotRaconteur::Companion::Util;
16namespace cam = com::robotraconteur::imaging;
17namespace img = com::robotraconteur::image;
18
19int main(int argc, char* argv[])
20{
21    // Register the standard Robot Raconteur types
22    RRC::RegisterStdRobDefServiceTypes();
23
24    // Use RobotRaconteur::NodeSetup to initialize Robot Raconteur
25    RR::ClientNodeSetup node_setup(std::vector<RR_SHARED_PTR<RR::ServiceFactory> >(), argc, argv);
26
27    // Create a DeviceConnector
28    RR_Util::DeviceConnector con;
29    con.Init();
30
31    // Create a DeviceConnectorDetails to connect to the camera
32    RR_Util::DeviceConnectorDetails d1("camera", RR_Util::CreateIdentifierFromName("gazebo_camera"),
33                                       {"com.robotraconteur.imaging.Camera"});
34
35    // Add the camera to the DeviceConnector
36    con.AddDevice(d1);
37
38    // Get the subscription to the camera
39    auto sub = con.GetDevice("camera");
40
41    // Get the camera client
42    auto c = sub->GetDefaultClientWait<cam::Camera>(5000);
43
44    // Capture an image and convert to OpenCV image type
45    cv::Mat frame1 = RR_Util::ImageToMat(c->capture_frame());
46
47    // Show image
48    cv::imshow("Image", frame1);
49    cv::waitKey();
50    cv::destroyAllWindows();
51
52    return 0;
53}
The following example uses a YAML file to specify the camera details.
1# devices.yml - Yaml file containing device information
2
3devices:
4  camera:
5    device: gazebo_camera
6    root_object_type: com.robotraconteur.imaging.Camera
 1# device_connector_yaml.py - Example of using the DeviceConnector class to connect to a device
 2
 3# To run this example:
 4#    python device_connector_yml.py --devices devices.yaml
 5
 6from RobotRaconteur.Client import *
 7from RobotRaconteurCompanion.Util.DeviceConnector import DeviceConnector, DeviceConnectorDetails
 8from RobotRaconteurCompanion.Util.ImageUtil import ImageUtil
 9import cv2
10import argparse
11
12# Parse command line arguments to get the devices yaml file object
13parser = argparse.ArgumentParser(description="Device connector example")
14parser.add_argument("--devices", type=argparse.FileType("r"), required=True, help="The devices yaml file")
15args, _ = parser.parse_known_args()
16
17# Create a DeviceConnector object and load the devices yaml file
18con = DeviceConnector(devices_yaml_f=args.devices)
19
20# Get the ServiceSubscription to the camera
21sub = con.GetDevice("camera")
22
23# Get the default client and capture and image
24c = sub.GetDefaultClientWait(10)
25raw_img = c.capture_frame()
26image_util = ImageUtil(client_obj=c)
27
28# Display the image
29img = image_util.image_to_array(raw_img)
30cv2.namedWindow("Image")
31cv2.imshow("Image", img)
32cv2.waitKey()
33cv2.destroyAllWindows()
 1// device_connector_yaml.cpp - Example of using the DeviceConnector class to connect to a device using a YAML file
 2
 3// To run the example:
 4//    device_connector_yaml --devices devices.yml
 5
 6#include <stdio.h>
 7#include <iostream>
 8#include <RobotRaconteur.h>
 9#include <RobotRaconteurCompanion/Util/DeviceConnector.h>
10#include <RobotRaconteurCompanion/StdRobDef/StdRobDefAll.h>
11#include <RobotRaconteurCompanion/Util/ImageUtil.h>
12#include <RobotRaconteurCompanion/Util/IdentifierUtil.h>
13#include <opencv2/highgui/highgui.hpp>
14#include <boost/program_options.hpp>
15#include <fstream>
16
17// Only use the RR alias in cpp files. Do not use it in header files.
18namespace RR = RobotRaconteur;
19namespace RRC = RobotRaconteur::Companion;
20namespace RR_Util = RobotRaconteur::Companion::Util;
21namespace cam = com::robotraconteur::imaging;
22namespace img = com::robotraconteur::image;
23
24int main(int argc, char* argv[])
25{
26
27    boost::program_options::options_description desc("Allowed options");
28    desc.add_options()("devices", boost::program_options::value<std::string>(),
29                       "YAML file containing device definitions");
30
31    // Parse known options. Use allow_unregistered() to allow unknown options due to
32    // possible --robotraconteur-* options being passed to the node
33    boost::program_options::variables_map vm;
34    boost::program_options::store(
35        boost::program_options::command_line_parser(argc, argv).options(desc).allow_unregistered().run(), vm);
36
37    // Open the YAML file
38    std::ifstream file(vm["devices"].as<std::string>());
39    if (!file.is_open())
40    {
41        std::cerr << "Error opening devices file" << std::endl;
42        return 1;
43    }
44
45    // Register the standard Robot Raconteur types
46    RRC::RegisterStdRobDefServiceTypes();
47
48    // Use RobotRaconteur::NodeSetup to initialize Robot Raconteur
49    RR::ClientNodeSetup node_setup(std::vector<RR_SHARED_PTR<RR::ServiceFactory> >(), argc, argv);
50
51    // Create a DeviceConnector and initialize from the YAML file
52    RR_Util::DeviceConnector con;
53    con.InitFromYamlFile(file);
54
55    // Get the subscription to the camera
56    auto sub = con.GetDevice("camera");
57
58    // Get the camera client
59    auto c = sub->GetDefaultClientWait<cam::Camera>(5000);
60
61    // Capture an image and convert to OpenCV image type
62    cv::Mat frame1 = RR_Util::ImageToMat(c->capture_frame());
63
64    // Show image
65    cv::imshow("Image", frame1);
66    cv::waitKey();
67    cv::destroyAllWindows();
68
69    return 0;
70}
PyRI Device Manager
The PyRI Open Source Teach Pendant uses a built-in “Device Manager”
to add and remove devices from the system. The Device Manager can be accessed using a user interface or a Robot Raconteur service.
The Device Manager is typically used with Robot Raconteur services that provide a DeviceInfo structure.
Third-party nodes can connect to the PyRI Device Manager and use it to connect to devices. In fact, almost all of the functionality provided by the PyRI Teach Pendant can be used through Robot Raconteur services. This is a powerful development option since it allows the developer to utilize all the features of PyRI while developing their projects.
The following example shows how to connect to the PyRI Device Manager and use it to connect to a camera:
 1# pyri_device_manager_client.py - Example of using the PyriDeviceManagerClient class to connect to a device
 2
 3# The package pyri-common must be installed to use this example. See https://github.com/pyri-project/pyri-core
 4# for more information.
 5
 6from pyri.device_manager_client import DeviceManagerClient
 7from RobotRaconteur.Client import *
 8from RobotRaconteurCompanion.Util.ImageUtil import ImageUtil
 9import cv2
10
11# Create the DeviceManagerClient object
12d = DeviceManagerClient()
13
14# Refresh the available devices from the service
15d.refresh_devices(1)
16
17# Get the default client and capture and image
18c = d.get_device_client("camera", timeout=10)
19raw_img = c.capture_frame()
20image_util = ImageUtil(client_obj=c)
21
22# Display the image
23img = image_util.image_to_array(raw_img)
24cv2.namedWindow("Image")
25cv2.imshow("Image", img)
26cv2.waitKey()
27cv2.destroyAllWindows()
Networking and Firewalls
Robot Raconteur uses standard IPv4 and IPv6 networking protocols to communicate between nodes when they
are on different computers, or using localhost (127.0.0.1) when they are on the same computer.
Currently, Robot Raconteur uses TCP/IP for communication; however, UDP/IP communication using
QUIC is planned. Networking can be an extremely complex topic
and has many pitfalls that can cause connections to fail. Robot Raconteur is primarily concerned with
local connections between devices on the same local Ethernet network, which reduces the complexity somewhat.
This section provides a brief overview of the relevant networking concepts to create connections. See
also the Networking and Firewall Configuration Application Note
for up-to-date information
on networking and firewall configuration, along with tooling to help configure networks correctly.
Note
See the Networking and Firewall Configuration Application Note for a more in-depth discussion of networking and firewall configuration.
Note
Robot Raconteur has the official TCP and UDP port number 48653 assigned by the IANA! The Robot Raconteur Port Sharer uses TCP port 48653. Server nodes that are not using the port sharer should use a different port number. UDP port 48653 is used for discovery.
Networking Fundamentals
Devices on an IP network have an “IP Address,” which allows for packets to be routed to the correct device.
IPv4 addresses are 32-bits and are typically written as four decimal numbers separated by periods, for example,
192.168.12.14. IPv4 addresses only have around 4 billion possible addresses, which means that it is not
possible to assign a unique address to every device in existence. Configuration is required
to guarantee a static IPv4 address, which causes significant complications.
IPv6 addresses use a 128-bit address space,
which allows for more than 340 trillion, trillion, trillion possible addresses. IPv6 addresses have the
concept of “link-local” addresses, which are only valid on a single local network. They start with
fe80::, and are followed by a 64-bit hexadecimal number, for example, fe80::6a23:fb1a:23b3:db79.
This number can be based on the MAC address
of the adapter or randomly generated. Crucially for Robot Raconteur, this is an automatically configured
address that is statistically guaranteed to be unique on the local network. Robot Raconteur can use both IPv4
and IPv6 addresses, but IPv6 is preferred since it is easier to configure and more robust. The discovery
and subscription system will return IPv6 addresses by default.
Note
By default, Linux uses a randomly generated IPv6 link-local address for privacy reasons. This random address may change occasionally, which is highly undesirable for Robot Raconteur services. To disable, run the following command in a terminal:
cat >> /etc/sysctl.conf <<EOT
net.ipv6.conf.all.use_tempaddr=0
net.ipv6.conf.default.use_tempaddr=0
EOT

sysctl -p
To determine the IP address of a device:
Use
ipconfigon Windows in a command promptUse
ip aon Linux in a terminalUse
ifconfigon MacOS in a terminal
These will typically return many addresses, some with a physical adapter attached to a network, but many more with virtual adapters that are not relevant. It is recommended that the Service Browser be used on the same computer as the client to determine the correct address to use since it can be very difficult to determine the correct address manually unless you are familiar with networking concepts.
Firewall Configuration
Most modern operating systems have a firewall that blocks incoming connections by default. This is an important security feature, but it will by default block Robot Raconteur connections. The firewall must be configured to allow full access for the program running the Robot Raconteur node. The following subsections discuss how to configure the firewall for different operating systems.
Note
Robot Raconteur uses IPv6 UDP multicast port 48653 for discovery. This port must be open for discovery, or the program must have an exception in the firewall!
Windows Firewall
By default, Windows will block Robot Raconteur. It is necessary to either add an exception or disable the firewall completely. Disabling the firewall is useful for a development environment, but in general, it is recommended to add an exception for the program running the Robot Raconteur node.
Instructions to disable the Windows Firewall: Windows Firewall
Instructions to add an exception to the Windows Firewall for a specific program: How to Allow or Block a Program Through Firewall Windows 10
When a program first starts and attempts to open a port, Windows will typically prompt the user to allow or block the connection. This is the easiest way to configure the firewall.
Linux Firewall
Ubuntu and Debian do not by default have a firewall enabled. If a firewall is enabled, it is typically UFW or iptables. Configuring these firewalls is more complex than Windows, and it is recommended to consult the documentation.
MacOS Firewall
MacOS does not typically have a firewall enabled that blocks Robot Raconteur connections.